Your First Deploy
Deploy your first application to seenode in under 5 minutes with our streamlined deployment process.
Welcome to seenode! This guide will get you from code to live application in just a few minutes, completely free. No credit card required.
Tip (Quick Start Options)
Already have an app ready? Jump directly to our framework-specific quickstarts for even faster deployment.
Prerequisites
Before you begin, make sure you have:
- A seenode account - Sign up for free
- Your application code hosted on a Git provider (GitHub or GitLab)
Note (Don't have an app ready?)
No problem! We’ll show you how to deploy a sample application, or you can fork one of our example repositories.
Choose Your Service Type
seenode offers different service types optimized for different use cases:
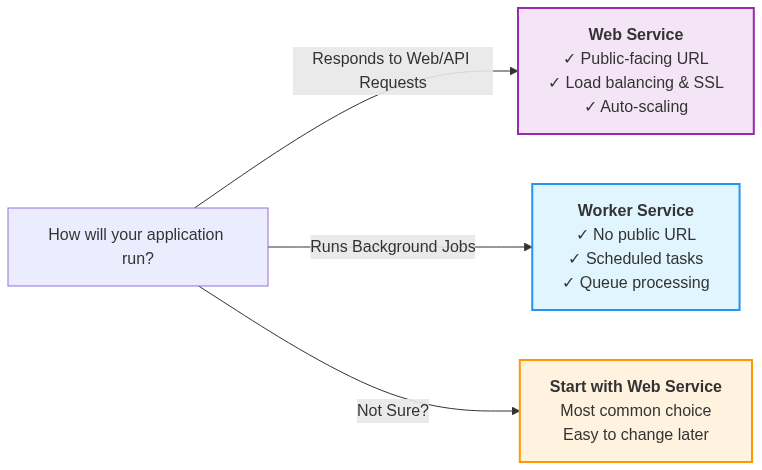
Best for: Web applications, APIs, websites that need to respond to HTTP requests
Examples: REST APIs, web applications (Django, React, Vue.js), static sites with server-side functionality
Key Features:
- Public URL provided automatically
- Auto-scaling based on traffic
- SSL certificates included
Best for: Background jobs, scheduled tasks, data processing
Examples: Data processing pipelines, scheduled jobs, queue workers, machine learning model training
Key Features:
- No public URL (runs in background)
- Configurable resource allocation
- Restart policies for reliability
Tip (Still not sure?)
When in doubt, choose Web Service. It’s the most common choice and you can always change it later.
Deploy Your Application
-
Sign up and Access Dashboard
Navigate to the seenode Dashboard and sign in to your account.
-
Create Service and Connect Git
Click the New button, select Web Service (or Worker Service), then:
- Select your Git provider (GitHub or GitLab)
- **Authorize seenode to access your repositories
- Choose the repository and branch you want to deploy (usually
mainormaster)
Tip (Repository Permissions)
seenode only requests access to the specific repositories you choose to deploy. Your private repositories remain secure.
-
Configure Your Service
seenode automatically detects your language/framework and suggests configuration:
- Name: Give your service a descriptive name
- Build & Start Commands: Auto-detected (modify only if needed)
- Environment Variables: Add any required variables
Warning (Configuration)
For most applications, the auto-detected settings work perfectly. Only modify them if you have specific requirements.
-
Deploy
Click Create Web Service and watch the build logs in real-time. Your app will be live in 1-5 minutes.
What Happens Next
Once deployed, seenode automatically:
- Pulls your code from Git
- Installs dependencies
- Builds your application
- Deploys with automatic load balancing
Deployment Progress:
- Building: Installing dependencies and building your app
- Deploying: Moving your app to production servers
- Live: Your app is now available at the provided URL
Tip (Deployment Time)
- Simple apps: 1-3 minutes
- Complex builds: 3-5 minutes
Troubleshooting
My build is failing
Common causes:
- Missing or incorrect
requirements.txt(Python) orpackage.json(Node.js) - Build command doesn’t match your project structure
- Environment variables not set correctly
Quick fixes:
- Check the build logs for specific error messages
- Verify your build command matches your local development setup
- Ensure all required files are committed to your repository
- Try deploying with the default auto-detected settings first
My app is not responding
Common causes:
- Application not listening on the correct host/port. Your app must listen on host
0.0.0.0and port80(default) or your selected port. - Start command is incorrect
- Application crashes on startup
Quick fixes:
- Ensure your app listens on
0.0.0.0and the correct port - Verify the start command in the seenode dashboard
- Review the application logs for error messages
I can’t access my database
Common causes:
- Database connection string not configured
- Database not created yet
Quick fixes:
- Create a database first in the seenode dashboard
- Add database connection environment variables
- Check that your application is in the same region as your database
Success! Your App is Live
Congratulations! Your application is now deployed and accessible via the URL provided by seenode.
What you get:
- Automatic deployments whenever you push to your connected branch
- Built-in monitoring and logging in your dashboard
- Free SSL certificate for secure HTTPS connections
Next Steps
Add a Database
Create a managed database in seconds for your application data.Framework Guides
Get specific guidance for your technology stack.Get Help
Join our discord community for tips and assistance.Ready to deploy another app? The process gets even faster once you’re familiar with the workflow. Most developers can deploy subsequent applications in under 2 minutes!