Configuring Your Application's Port
Learn how to configure ports for your applications on seenode and understand how routing works.
seenode automatically routes traffic from the internet to your running web service. To ensure your application can receive this traffic, the service must listen on the container port that you configure in the dashboard. There is no default port; the Port input must be set before your first deployment.
Port Configuration Basics
- Choose the internal container port that your application listens on (for example
4000). - Update your start command so the application binds to that port on host
0.0.0.0. - Save the configuration and redeploy. The load balancer uses the value you provided to proxy traffic from ports
80/443to your container. - Need to change the port later? Open your service and go to the project’s Settings tab, update the Port input, and redeploy.
Where to Set the Port
- You set the port in the service setup screen under the Port input. This is the single source of truth for routing and starts empty until you pick a value.
- After the service is created, you can revisit the Port input from the project’s Settings tab and adjust it at any time.
- Do not rely on a
PORTenvironment variable. seenode does not provide one, and it is not required.
How Routing Works
- A user sends a request to your application’s public URL (e.g.,
https://my-app.seenode.app). - The request hits seenode’s load balancer on port 80 (for HTTP) or 443 (for HTTPS).
- The load balancer forwards the request to your application’s container on the port you configured (for example
4000).
Example: Configuring a Flask App
Here’s how to correctly configure a simple Flask application to work with seenode’s environment.
Configure the port in the dashboard
Set the internal port to match what your application expects (e.g.,
4000). This value is used by the load balancer to forward traffic to your container.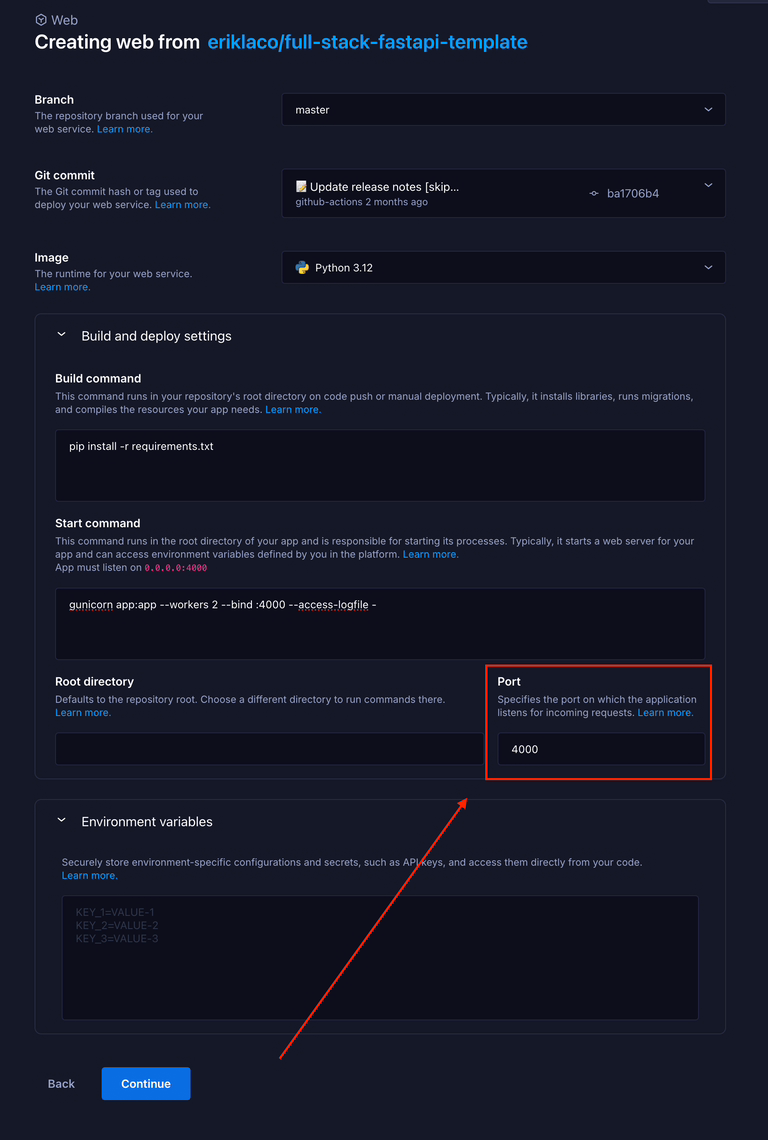
Bind your application to the same port
Ensure your application listens on
0.0.0.0and the same port you configured in the dashboard. Provide a default value for local development as needed.app.py import osfrom flask import Flaskapp = Flask(__name__)# Choose the same port you set in the dashboard (e.g., 4000)port = int(os.environ.get("FLASK_PORT", 4000))@app.route('/')def hello_world():return 'Hello, World!'if __name__ == '__main__':app.run(host='0.0.0.0', port=port)Ensure your start command is correct
Your start command should simply run the application.
Terminal python app.pyFor a production application, you would use a production server like Gunicorn and bind it to the correct host and port. Make sure the port matches the dashboard value you set, as there is no automatic default.
Terminal gunicorn app:app --bind 0.0.0.0:4000
By following this pattern, your application will work seamlessly with seenode’s automatic routing and port management, both in production and during local development.