Skip to content

Your First Deploy

Deploy Your First Application in Under 5 Minutes

Section titled “Deploy Your First Application in Under 5 Minutes”

Welcome to Seenode! This guide will get you from code to live application in just a few minutes, completely free. No credit card required.

By the end of this guide, you’ll have:

  • A live, publicly accessible application
  • Automatic deployments from Git
  • Real-time deployment logs and monitoring
  • Understanding of how to scale and customize your app

Before you begin, make sure you have:

  • A Seenode account - Sign up for free
  • Your application code hosted on a Git provider (GitHub or GitLab)

Seenode offers different service types optimized for different use cases. Use this decision tree to determine which service type is right for your application:

Service Type Decision Tree - A flowchart helping you choose between Web Service and Worker Service based on your application's needs

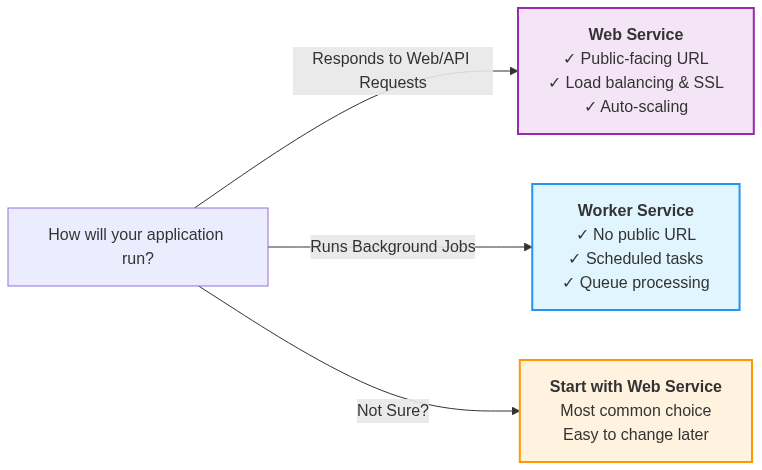
Best for: Web applications, APIs, websites that need to respond to HTTP requests

Examples:

  • REST APIs (FastAPI, Flask, Express.js)
  • Web applications (Django, React, Vue.js)
  • Static sites with server-side functionality

Key Features:

  • Public URL provided automatically
  • Built-in load balancing
  • Auto-scaling based on traffic
  • SSL certificates included

Here are some real-world examples to help you decide:

Application TypeService TypeWhy?
Blog or Portfolio Site Web ServiceUsers access via browser, needs public URL
REST API Web ServiceOther apps make HTTP requests to it
React/Vue.js App Web ServiceUsers access via browser
Email Newsletter Sender Worker ServiceRuns on schedule, no user interface
Data Processing Pipeline Worker ServiceBackground processing, no HTTP requests
Image Resizing Service Worker ServiceTriggered by events, not user requests
Discord Bot Worker ServiceResponds to events, no web interface
Machine Learning Model Worker ServiceTraining/inference jobs, not web-facing
  1. Access the Seenode Dashboard

    Navigate to the Seenode Dashboard and sign in to your account.

  2. Create a New Service

    Click the New button and select Web Service (or Worker Service if you chose that option above).

  3. Connect Your Repository

    1. Select your Git provider (GitHub or GitLab)
    2. Authorize Seenode to access your repositories
    3. Choose the repository containing your application
    4. Select the branch you want to deploy (usually main or master)
  4. Configure Your Service

    Seenode will automatically analyze your repository and suggest configuration:

    Service Details:

    • Name: Give your service a descriptive name

    Build & Deploy Settings:

    • Build Command: Seenode automatically detects your language/framework
    • Start Command: The command to run your application
    • Environment Variables: Add any required environment variables
  5. Review and Deploy

    1. Review your configuration - all settings can be changed later
    2. Click “Create Web Service” to start the deployment
    3. Watch the build logs in real-time as Seenode builds and deploys your app

Once you click deploy, Seenode will:

  1. Pull your code from the connected repository
  2. Install dependencies automatically based on your project files
  3. Build your application using the configured build command
  4. Deploy to our infrastructure with automatic load balancing

Deployment Progress Indicators:

  • Building: Installing dependencies and building your app
  • Deploying: Moving your app to production servers
  • Live: Your app is now available at the provided URL
My build is failing

Most common causes:

  • Missing or incorrect requirements.txt (Python) or package.json (Node.js)
  • Build command doesn’t match your project structure
  • Environment variables not set correctly

Quick fixes:

  1. Check the build logs for specific error messages
  2. Verify your build command matches your local development setup
  3. Ensure all required files are committed to your repository
  4. Try deploying with the default auto-detected settings first
My app is not responding

Most common causes:

  • Application not listening on the correct host/port. Your app must listen on host 0.0.0.0 and port 80 (default) or your selected port via the PORT environment variable.
  • Start command is incorrect
  • Application crashes on startup

Quick fixes:

  1. Ensure your app listens on 0.0.0.0 and the correct port
  2. Verify the start command in the Seenode dashboard
  3. Review the application logs for error messages
  4. Test your start command locally first
I can’t access my database

Most common causes:

  • Database connection string not configured
  • Database not created yet
  • Firewall or network restrictions

Quick fixes:

  1. Create a database first in the Seenode dashboard
  2. Add database connection environment variables
  3. Check that your application is in the same region as your database

Congratulations! Your application is now deployed and accessible via the URL provided by Seenode.

What happens next:

  • Automatic deployments whenever you push to your connected branch
  • Built-in monitoring and logging in your dashboard
  • Free SSL certificate for secure HTTPS connections
  • Load Balancing for high availability and traffic distribution

Now that your first app is live, here’s how to make it production-ready:

Add a Database

Create a managed database in seconds for your application data.

Popular choices:

  • PostgreSQL for complex applications
  • MySQL for traditional web apps

Create Database →

Custom Domain

Coming Soon

Replace the Seenode URL with your own professional domain name.

Includes:

  • Free SSL certificates
  • Automatic certificate renewal
  • DNS management assistance

Environment Variables

Coming Soon

Configure your app with production settings and API keys.

Best practices:

  • Separate development/production configs
  • Secure secret management
  • Easy variable updates

Scale & Monitor

Coming Soon

Optimize performance as your application grows.

Features:

  • Auto-scaling based on traffic
  • Performance metrics
  • Real-time monitoring

Get even more specific guidance for your technology stack:

Django

Full-featured Python web framework with admin interface. Django Guide →

Flask

Lightweight Python web framework for rapid development. Flask Guide →


Ready to deploy another app? The process gets even faster once you’re familiar with the workflow. Most developers can deploy subsequent applications in under 2 minutes!