Deploy Astro App on Seenode | Astro Hosting & Deployment Guide
Deploy your Astro app on Seenode with a simple setup. Follow our quickstart guide to configure, connect Git, and go live in minutes.
Astro is a modern, content-focused web framework for building fast websites using the Islands Architecture. This guide shows how to deploy your existing Astro project as a web service on seenode.
Prerequisites
Before you begin, ensure you have:
- Node.js 18+ installed locally
- Git configured on your machine
- A seenode account at seenode.com
- Existing Astro project ready to deploy
Configure for seenode Deployment
Enable Server-Side Rendering (SSR)
To deploy as a web service, Astro needs to be configured for server-side rendering. Install the Node.js adapter:
npx astro add nodeThis will automatically update your astro.config.mjs and install the required dependencies.
Port Configuration
Set the container port in the Port input during service setup, then bind your server to the same port on 0.0.0.0. There is no default port, so choose one (for example, 80) and you can change it later in the project’s Settings tab. Configure your Astro project accordingly:
import { defineConfig } from 'astro/config';import node from '@astrojs/node';
export default defineConfig({ output: 'server', // Enable SSR mode adapter: node({ mode: 'standalone' }), server: { // Bind to 0.0.0.0 and use the same port you set in the dashboard. // Example: use 80 in production, 4321 for local development. port: process.env.NODE_ENV === 'production' ? 80 : 4321, host: true // Bind to 0.0.0.0 for container networking }});::::note[Port input is the source of truth] In seenode, the Port input in the dashboard tells the load balancer which container port to proxy to. Make sure your application binds to the same port. You can change this anytime from the project’s Settings tab. ::::
Update Package Scripts
Ensure your package.json includes the following scripts:
{ "scripts": { "dev": "astro dev", "build": "astro build", "preview": "astro preview", "start": "NODE_ENV=production node ./dist/server/entry.mjs" }}::::note[Understanding the Configuration]
output: 'server': Enables server-side rendering modeadapter: node(): Uses the Node.js adapter for server deploymentmode: 'standalone': Creates a standalone server executablestartscript: Runs the built server directly ::::
Deploy on seenode
Push to Git
Commit your project and push it to GitHub or GitLab.
Create a Web Service
From the seenode Dashboard, create a new Web Service and connect your repository.
Configure Build & Start
seenode detects a Node.js project. Configure:
- Build Command:
npm ci && npm run build - Start Command:
npm start
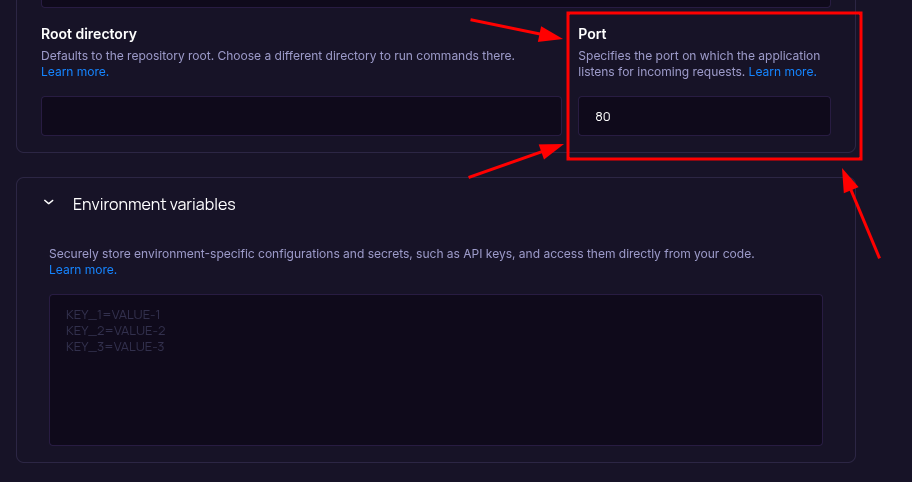
There is no default port. Set the Port field (above Environment Variables) before your first deploy. You can revisit this input any time from the project’s Settings tab.
- Build Command:
Choose Pricing Tier
Select your preferred instance size and create the service.
Deploy
Click Create Web Service and watch logs until your web service is live.
Success
Once complete, your Astro application is accessible via your service’s URL.
::::tip[Troubleshooting] If your deployment fails, the first place to check is the Logs tab in your seenode service dashboard. Build and runtime logs often contain valuable information for diagnosing issues.
Port configuration mismatch
- There is no default port. Ensure your application listens on the port you set in the Configure Build & Start screen.
- Adjust in framework code if needed (for example, change the port passed to your adapter server).
- Seeing a 502 Bad Gateway? This often means your app is not listening on the configured port. ::::
Starting from Scratch?
If you don’t have an Astro project yet:
Option 1: Use our Template (Recommended)
Astro Web Service Template
Deploy a minimal Astro web service with SSR, API endpoints, and seenode optimization.Option 2: Create from Astro Docs + seenode Setup
Follow the official Astro documentation to create a new project, then return here for seenode-specific deployment steps.
seenode-Specific Setup Steps:
- Run
npm create astro@latest - Select the
minimaltemplate - Install Node.js adapter:
npx astro add node - Configure for seenode (see “Configure for seenode Deployment” above)
Troubleshooting
If your deployment fails, check the Logs tab. Here are solutions to common issues:
::::note[Common Issues by Symptom]
502 Bad Gateway / Service Unavailable
- Ensure your
startscript runs the built server:node ./dist/server/entry.mjs - Verify
NODE_ENV=productionis set in your start command - Check that the Node.js adapter is properly configured in
astro.config.mjs - Ensure
host: true