

Deploy Phoenix App on Seenode | Phoenix Hosting & Deployment Guide
This guide explains how to deploy your existing Phoenix application on seenode.
Prerequisites
Section titled “Prerequisites”Before you begin, ensure you have:
- A seenode account at cloud.seenode.com
- Git configured on your machine
- Existing Phoenix project ready to deploy
Configure for seenode Deployment
Section titled “Configure for seenode Deployment”Production Configuration
Section titled “Production Configuration”Your service must listen on the same port that you configure in the Port field for the web service. Choose a port (for example, 80 or 8080) and use it both in your Phoenix config and in the dashboard.
For a framework-agnostic explanation of how ports work on seenode, see Configuring Your Application’s Port.
import Config
config :hello,  generators: [timestamp_type: :utc_datetime]
# Configures the endpointconfig :hello, HelloWeb.Endpoint,  url: [host: System.get_env("PHX_HOST") || "localhost", port: 80],  adapter: Bandit.PhoenixAdapter,  render_errors: [    formats: [html: HelloWeb.ErrorHTML, json: HelloWeb.ErrorJSON],    layout: false  ],  pubsub_server: Hello.PubSub,  live_view: [signing_salt: "Kute9Cn2"],  http: [port: 80],  server: true
Build Script
Section titled “Build Script”Create a build.sh script to streamline deployments:
#!/usr/bin/env bash# exit on errorset -o errexit
# Initial setupmix local.hex --forcemix local.rebar --force
# Install dependenciesmix deps.get --only prod
# Compile and build assetsMIX_ENV=prod mix compileMIX_ENV=prod mix assets.buildMIX_ENV=prod mix assets.deploy
Make the script executable: chmod +x build.sh
Deploy on seenode
Section titled “Deploy on seenode”Push to Git
Commit your project and push it to GitHub or GitLab.
Create a Web Service
From the seenode Dashboard, create a new Web Service and connect the Git repository for your Phoenix application.
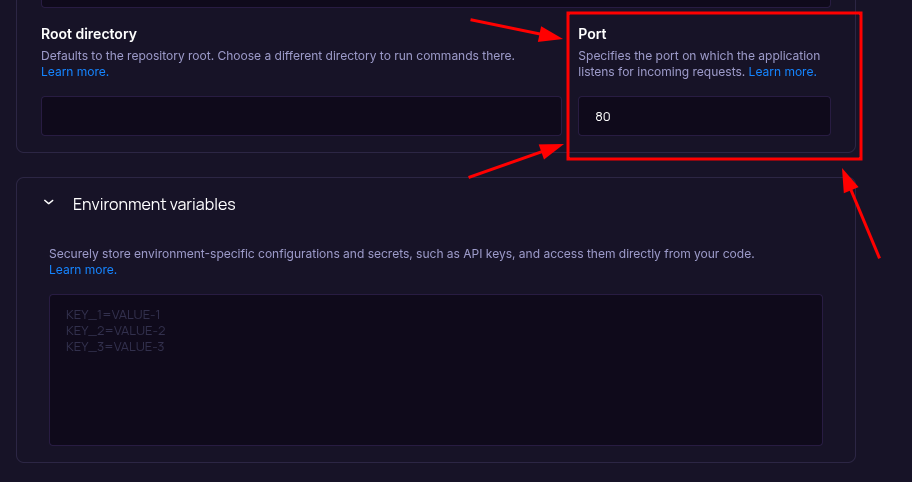
Set the Port field (above Environment Variables) to the value your Phoenix app listens on (for example,
80or8080). Ensure yourconfig/prod.exsuses the same port in thehttp: [port: …]setting. The field starts empty, so set it before your first deploy. After the service is created, you can change the port from the project’s Settings tab. You do not need to add aPORTenvironment variable.Configure Build & Start Commands
seenode automatically detects an Elixir project. Configure the build and start commands:
Build Command (choose one approach):
Option A: using the provided script:
Terminal window ./build.shOption B: direct commands:
Terminal window mix local.hex --force && mix local.rebar --forcemix deps.get --only prodMIX_ENV=prod mix compileMIX_ENV=prod mix assets.buildfrom theMIX_ENV=prod mix assets.deployStart Command:
Terminal window MIX_ENV=prod mix phx.serverConfigure Port and Environment Variables
Add any additional environment variables your application needs, such as:
SECRET_KEY_BASE: generate locally with(required for production)mix phx.gen.secret
Choose Pricing Tier
Select your preferred instance size and click Create Web Service.
Deploy
Click Create Web Service and watch logs until your web service is live.
Success
Once complete, your Phoenix app is live and accessible at your service’s public URL.
Prefer configuring environment variables later? Open the service dashboard’s Environment tab and add
SECRET_KEY_BASEthere, although completing it in the prior step keeps the deploy smoother.
Starting from Scratch?
Section titled “Starting from Scratch?”If you don’t have a Phoenix project yet:
Option 1: Use our Template (Recommended)
Phoenix Template
Deploy a minimal Phoenix application designed for zero-configuration deployment.Option 2: Create from Phoenix Docs + seenode Setup
Follow the official Phoenix documentation to create a new project, then return here for seenode-specific deployment steps.
seenode-Specific Setup Steps:
- Install Phoenix:
mix archive.install hex phx_new - Create project:
mix phx.new your_project - Configure production settings
- Create build script
Next Steps
Section titled “Next Steps”Now that your Phoenix app is deployed, here are some recommended next steps:
Set up a Custom Domain (Coming Soon)
Configure a custom domain to point to your new web service.Connect to a Database
Instantly scaffold and connect PostgreSQL and MySQL databases