So, you’ve built your Django app. Now it’s time to launch it online. That’s where AWS EC2 deployment comes in.
AWS lets you scale easily, control your setup, and keep costs low. In this guide, you’ll learn how to deploy a Django app on AWS EC2 with Gunicorn and Nginx.
This is a great way to create a real-world production environment. You’ll also target best practices like setting up a WSGI server (Gunicorn) and a reverse proxy (Nginx). If you’ve searched for information on how to deploy Django with Gunicorn and Nginx, this tutorial is what you need.
Don’t worry if you’re new. This tutorial is beginner-friendly. You’ll learn what each tool does and how they work together. Let’s get started!
What You Need Before You Start
Before we begin the Django EC2 deployment process, ensure you have the basics ready. Here’s what you’ll need to follow along:
- A working Django project (any simple app is fine)
- A free AWS account
- Git is installed on your local machine
- Terminal or command-line access
- Some basic understanding of Python
- A stable internet connection
We’ll also be using a Linux server (Ubuntu). You don’t need to be a Linux expert, but you should be comfortable using a few terminal commands.
Finally, you’ll need to create an SSH key pair in AWS. This is a safe way to log in to your cloud server. You’ll use the .pem file to connect to your EC2 instance.
Step 1: Launch an EC2 Instance on AWS
EC2 stands for Elastic Compute Cloud. It’s like renting a virtual computer in the cloud. It runs 24/7 and is perfect for hosting apps.
Here’s how to set a Django EC2 deployment:
- Log in to your AWS dashboard.
- Click EC2 under the “Compute” section.
- Select Launch Instance.
- Choose an OS. Pick Ubuntu 22.04 LTS.
- Choose a free-tier instance: t2.micro.
- Set up a new key pair (important!). Download the .pem file.
- In the network settings, allow the following ports:
- Port 22 (for SSH access)
- Port 80 (for web traffic)
- Port 443 (for secure HTTPS)
- Click Launch Instance.
Once the server starts, go to your EC2 dashboard and copy the public IP address. This is how you’ll connect to it from your computer.
Step 2: Connect to Your EC2 Server
Now it’s time to log in to your EC2 instance.
- Set the Correct Permissions for Your Key File: Before you can use your key to SSH into your server, you need to set the proper permissions for the .pem file. This is crucial to secure the key and ensure it’s only readable by you.
Run the following command in your terminal:
chmod 400 your-key.pemThis will restrict access to the key so only you can read it.
- SSH into Your EC2 Instance: Now that the key file is ready, you can SSH into your EC2 instance. Use the following command to connect to your server:
ssh -i your-key.pem ubuntu@your-ec2-ipReplace your-key.pem with the name of your key file, and your-ec2-ip with your EC2 instance’s public IP address.
Important Note: Ensure you run this command from the same directory stored in your key file. If you’re in a different directory, you can either navigate to the directory where your key file is located or provide the full or relative path to the key file.
For example, if your key file is in a different folder, you can use the full path:
ssh -i /path/to/your-key.pem ubuntu@your-ec2-ipOr use a relative path if you’re one level up:
ssh -i ../your-key.pem ubuntu@your-ec2-ip- You’re Now Logged In: Once the command is executed successfully, you will be logged in as the Ubuntu user on your EC2 instance. From here, you can manage your server and deploy your Django application.
Step 3: Set Up Your Server Environment
Your server is empty right now. Let’s prepare it for Django.
Start by updating the system packages:
sudo apt update && sudo apt upgrade -yThen install the tools you’ll need:
sudo apt install python3-pip python3-dev python3-venv git -yThis installs Python, pip, virtual environments, and Git.
Now, move to the home directory and clone your Django project:
cd ~git clone https://github.com/your-username/your-django-app.gitcd your-django-appSet up a virtual environment:
python3 -m venv venvsource venv/bin/activateInstall your Python packages:
pip install -r requirements.txtIf you don’t yet have a requirements.txt, you must generate it on your local machine (not the server). Here’s how you do it:
- On your local machine, navigate to your Django project folder.
- Ensure your local environment is set up and the necessary packages are installed (pip install
package_name).
Run the following command to create one using:
pip freeze > requirements.txtThis command generates a list of all installed Python packages and their versions. Now, upload the requirements.txt to your server, and you can install the dependencies as shown above.
Step 4: Configure Django for Production
Django is built for both development and production. In production, we need a few extra settings.
Open settings.py in your project. Find the line that says DEBUG = True. Change it to:
DEBUG = FalseThis turns off error messages from showing in the browser.
Then, set allowed hosts:
ALLOWED_HOSTS = ['your-ec2-ip']This tells Django to allow access from your server’s IP.
Next, run this to collect static files:
python manage.py collectstaticStatic files are images, CSS, and JavaScript. Django gathers them in one folder for easy access.
It’s also smart to move your secret key and settings to a .env file for security. The python-dotenv package can securely load them.
Step 5: Install and Run Gunicorn
Gunicorn helps deploy Django with Gunicorn and Nginx by acting as the WSGI server.
Install Gunicorn:
pip install gunicornThen test it by running:
gunicorn --bind 0.0.0.0:8000 your_project_name.wsgi:applicationReplace your_project_name with the actual folder name of your Django project.
Now, visit http://your-ec2-ip:8000. You should see your Django app running!
Step 6: Install and Configure Nginx
Gunicorn is good, but it’s not made to face the internet alone. Nginx is a web server that helps manage traffic and static files. It sits in front of Gunicorn and sends requests to it.
Install Nginx:
sudo apt install nginx -yCreate a new config file:
sudo nano /etc/nginx/sites-available/yourprojectPaste this inside:
server {    listen 80;    server_name <your-ec2-ip>;  # Replace this with your actual EC2 public IP or domain
    location = /favicon.ico {        access_log off;        log_not_found off;    }
    location /static/ {        alias /home/ubuntu/your-django-app/static/;  # Ensure this path matches your STATIC_ROOT    }
    location / {        proxy_set_header Host $host;        proxy_set_header X-Real-IP $remote_addr;        proxy_set_header X-Forwarded-For $proxy_add_x_forwarded_for;        proxy_set_header X-Forwarded-Proto $scheme;        proxy_pass http://127.0.0.1:8000;    }}
Enable it:
sudo ln -s /etc/nginx/sites-available/yourproject /etc/nginx/sites-enabledTest the configuration:
sudo nginx -tThen restart Nginx:
sudo systemctl restart nginxNow, go to http://your-ec2-ip and you’ll see your Django with Gunicorn and Nginx!
Step 7: Open Server Ports
By default, your firewall might block traffic. Let’s open it up:
sudo ufw allow 'Nginx Full'sudo ufw enableThis opens HTTP and HTTPS access. Now, anyone can reach your app.
Step 8: Keep the App Running with Supervisor
Gunicorn will stop if your server restarts. Let’s fix that with Supervisor. It keeps apps running even if one of them crashes.
Install Supervisor:
sudo apt install supervisor -yCreate a config:
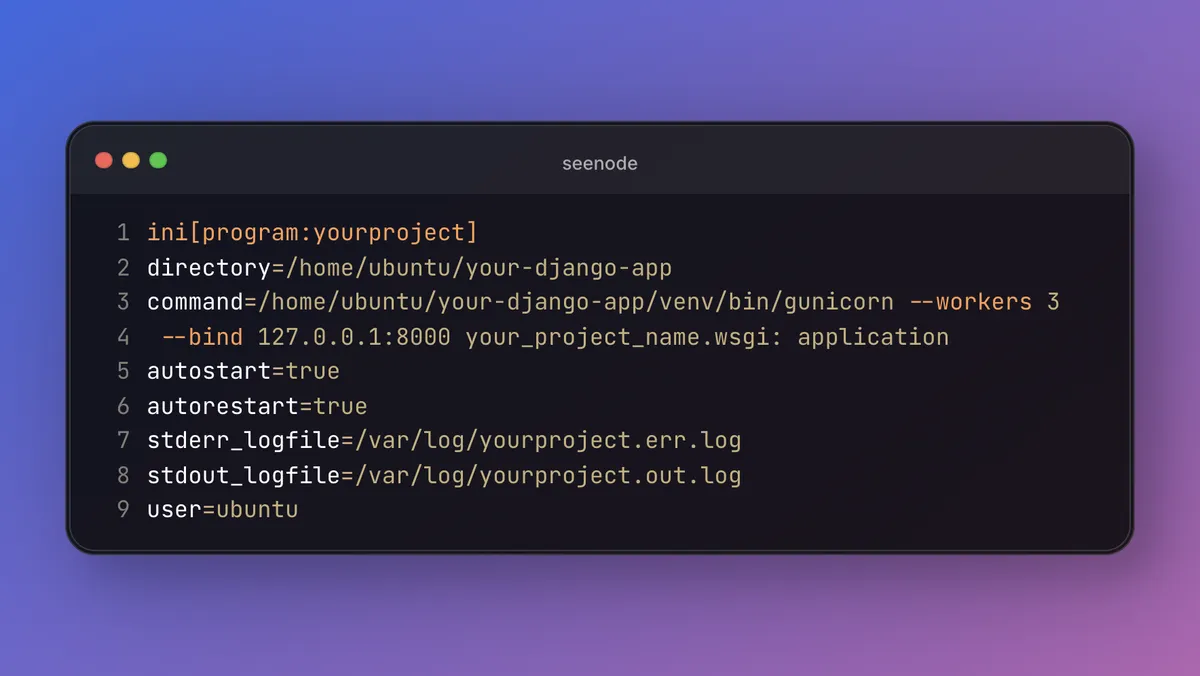
sudo nano /etc/supervisor/conf.d/yourproject.confPaste this:
ini[program:yourproject]directory=/home/ubuntu/your-django-appcommand=/home/ubuntu/your-django-app/venv/bin/gunicorn --workers 3 --bind 127.0.0.1:8000 your_project_name.wsgi: applicationautostart=trueautorestart=truestderr_logfile=/var/log/yourproject.err.logstdout_logfile=/var/log/yourproject.out.loguser=ubuntuThen restart Supervisor:
sudo supervisorctl rereadsudo supervisorctl updatesudo supervisorctl start yourprojectThat’s it! Now your app will stay alive even after reboots.
Final Tips and Troubleshooting
✅ If your site doesn’t load, check your EC2 security group settings.
✅ Use sudo supervisorctl status yourproject to see if Gunicorn is running.
✅ Check logs for errors: tail -f /var/log/yourproject.err.log
✅ Always restart services after making changes.
To go further, consider:
- Adding a custom domain
- Setting up HTTPS with Let’s Encrypt
- Using a database like PostgreSQL
These can improve speed, safety, and professionalism.
Conclusion: You’re Live!
Great work! You’ve just deployed a Django app on AWS EC2 using real tools like Gunicorn and Nginx, which are used in actual production websites.
Now your app is online and ready for users. You’ve taken a big step as a developer.
If you enjoyed this guide, check out more deployment tutorials at Seenode.com. We make backend tech simple and fun.
Want a guide on HTTPS or domain setup next? Just ask!